What are Jupyter Notebooks and why would I want to use one?
Jupyter notebooks are primarily a way to generate reproducible scientific analysis workflows in python. You can mix documentation, code, tables, and figures in one executable document which can easily be shared and published to the web. Here is a good examle of a notebook demonstrating the ipyrad.analysis.pca module. In this notebook you can see the benefit of intermingling expanatory text, with executable code, and results:
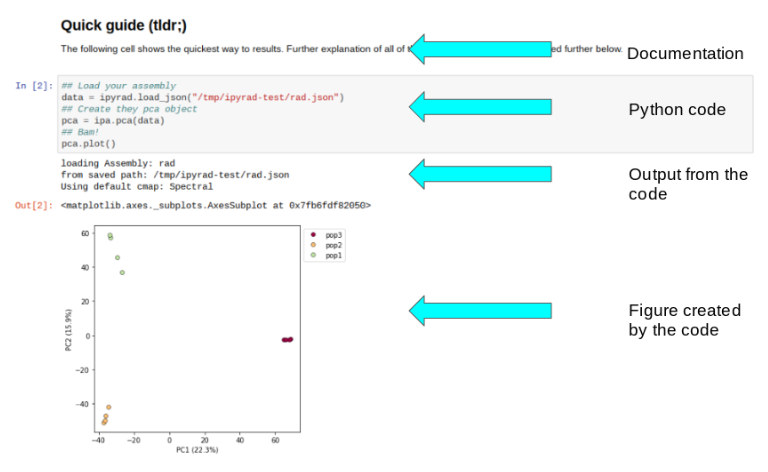
And this is not a static document! I can open this notebook and recreate my entire analysis, or even tweak things and rerun it without having to wrangle a ton of different scripts, or try to remember the parameters for a bunch of esoteric analyses I ran, or even remember which analyses I ran, because they’re all here in one document.
Insert live notebook demo
If you are familiar with RStudio, the workflow is somewhat similar, the main difference being that with jupyter notebooks you can export your entire session with figures, tables, and results, all embedded between consecutive “tasks” specified by blocks of code.
ipyrad analysis tools are best run inside Jupyter notebooks, as the analysis can be monitored and tweaked and provides a self-documenting workflow, so we will focus the rest of the workshop on exploring the anaylsis tools in the jupyter notebook environment.
Getting Set up with Jupyter Notebooks
Setting up a jupyter notebook session involves running one command on your local machine, and a couple of commands on the cluster. Some of these commands are picky so it’s important to be careful and pay special attention until you’re very comfortable with the process.
Overview of process
- Establish jupyter notebook ssh tunnel: Windows - Mac/Linux
- Set Jupyter notebook password
- Create the config file
- Start remote notebook server
- What do do if your notebook isn’t working
- More information about jupyter
Jupyter notebook setup to be run on your local computer
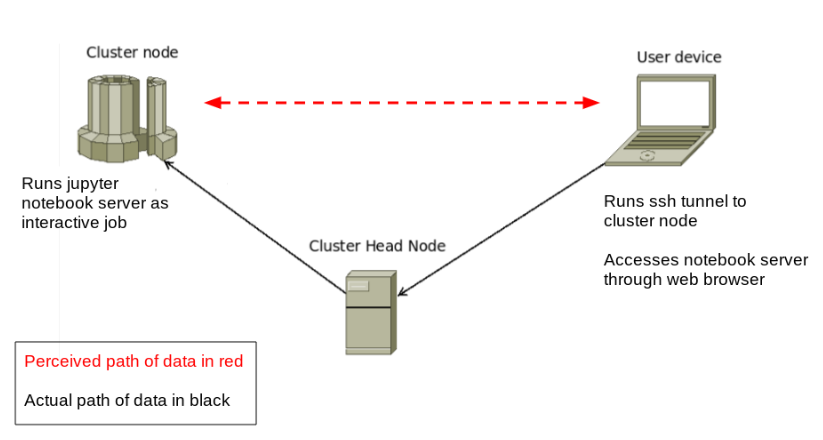
Jupyter notebooks running on a cluster require a special kind of connection called an SSH Tunnel. We need to do this because we really only can “see” the head node from the outside world. In other words, we can only ssh directly to the head node, we can not ssh directly from our laptops to the compute nodes. Yet, the compute nodes are where we want to run the notebooks, so what are we to do? Since we can ssh to the head node, and since we can do basically whatever we want once we are there, we can set up a “tunnel” to route messages from our laptop to the compute nodes. Here’s a diagram of the process, where the green arrow indicates the SSH tunnel, and the red arrows indicate the messages being passed between your laptop and the cluster, essentially using ssh to “tunnel” traffic between these two computers:

The end result is that we’ll be able to sit on our laptops and run complicated analyses on the compute node as if we were actually running directly on the cluster, in this way taking advantage of both the resources of the cluster, and the convenience of the notebook environment:
SSH Tunnel Configuration
This part is run on your local computer. An “ssh tunnel” will allow your computer to talk to the notebook server on the cluster by using the web browser. It’s a little confusing at first, but once you see it up and running, it will make more sense and we hope you will find it very clever and useful.
Note on terms: A “port” is just a number, like the address of a house, or a telephone number. Every computer has 32,000 ports, most of which are unused. You might not know this, but when you use a web browser to look at a web page, your computer is talking to the remote server on port 80. This is standardized. When you
sshto the USP cluster you are making a connection on port 22, and this is standard too.
We can tell computers to talk to each other on different ports, and this is what we’ll do here, since we have 25 people who all want to talk to the cluster, we need to specify 25 different ports. Because each notebook must have a unique port number to run on, we have assigned unique port numbers for each workshop attendee. You can you can find your port number here: AF-Biota workshop port #s.
Special Note: An “SSH Tunnel” and an “SSH client connection” are two different things. The SSH client connection gives you access to the command line on a remote machine. The SSH tunnel will allow your web browser to talk to your jupyter notebook using ssh, but on a unique port. For a jupyter notebook to function properly you will normally always need both an ssh tunnel (for making the web interface work) and an ssh client connection (for running the jupyter notebook server).
Windows SSH Tunnel Configuration
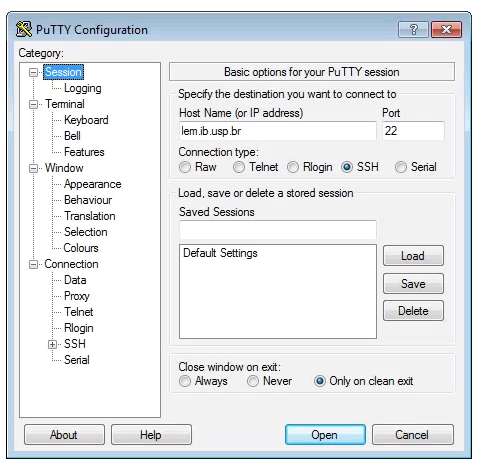
To set up a SSH Tunnel on a Windows machine, we use puTTY again. Open puTTY and fill out the host address in the first screen, like you do when connecting to the cluster.
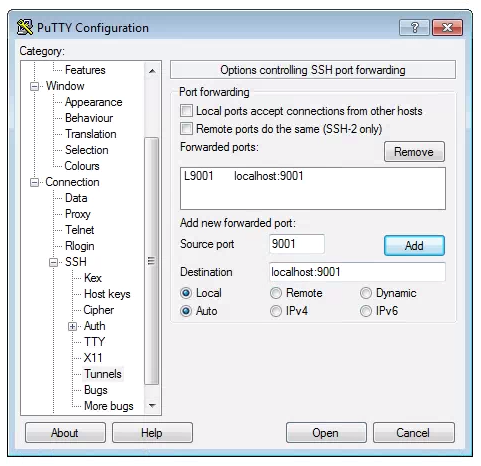
Now, click on SSH on the left panel, and click on Tunnels. Fill out your personal port # at “Source port”, and “localhost:your_port_#” at “Destination”. Click “Add” and “L_your_port_# localhost:your_port_#” should appear in the empty window. Click “Open” and log in.
Mac/Linux SSH Tunnel Configuration
SSH Tunnel on Mac/Linux can be established through the command line interface. Open a Terminal and run this command:
ssh -N -f -L localhost:<my_port_#>:localhost:<my_port_#> <username>@lem.ib.usp.br
This will prompt you for your password (the password on the USP cluster). If you type the password correctly it will look like nothing happened, but this means it worked! If you think nothing happened you should not attempt to run it again because of panic, because if you run it twice you might see this error message:
bind: Address already in use
channel_setup_fwd_listener: cannot listen to port: 9000
Note: If you see this message it means your ssh tunnel is already running!! So you should celebrate! And not panic more because you got a (seeming) error message.
Jupyter Notebook Setup which will be run on the USP cluster
Everything else in the setup process takes place in a terminal on the USP cluster. Begin this part of setup by connecting to the cluster:
$ ssh <username>@lem.ib.usp.br
Installing Jupyter
If you already installed ipyrad then you can skip this step.
jupyter is installed as a dependency of ipyrad. If you
need to install juypter/ipyrad still run this command in a terminal
window on the cluster:
$ conda install ipyrad -c ipyrad
Set Jupyter Notebook Password
Jupyter was already installed as a dependency of ipyrad, so we just need to set a password before we can launch it. This command will prompt you for a new password for your notebook (you will only ever have to do this once on the HPC):
$ jupyter notebook password
This will set a password on your notebook server so that other people won’t have access to your files and notebooks. The notebook server will prompt you for your password when you initially connect to it.
Note: The password tho access your jupyter notebook and the password for your cluster login are two different passwords. It will probably reduce confusion, though, if you make them the same, at least for now.
Set default configuration behavior
There are a couple arguments that we always want to start the jupyter notebook with, so it is often convenient to just add these to the configuration file, rather than type them out over and over. You will only have to do this one time on the USP cluster.
The first parameter (open-browser = False) directs jupyter to run in
the background and wait for connections. The second parameter (port = <my_port_#>)
is very important for us. Each user must enter the port number
they were assigned on the AF-Biota workshop port #s page, and this should be the same port as entered
above for the ssh tunnel. The final parameter (port_retries = 0)
prevents jupyter from assigning us a random port if our assigned port
is not available. This is useful because if we’re already running
a notebook server and we try to start another one we don’t want the new
one to start, rather just to be informed that we’re already running one.
We are going to use the printf command to write the 3 parameter settings
to the jupyter config file. First, just run this command and you’ll see
that printf simply prints the properly formatted parameters to the screen.
The \n character is a special character that means “put a new line here”.
$ printf "c.NotebookApp.open_browser = False\nc.NotebookApp.port = 9000\nc.NotebookApp.port_retries = 0\n"
c.NotebookApp.open_browser = False
c.NotebookApp.port = <my_port_#>
c.NotebookApp.port_retries = 0
Now we can spice it up a bit by using “output redirection”, which is a
feature of the linux command line. The > special character can
redirect output that would normally get printed to the screen and
write it to a file instead. So running the following command will
create the .jupyter/jupyter_notebook_config.py file with the
exact parameter settings we want.
$ printf "c.NotebookApp.open_browser = False\nc.NotebookApp.port = 9000\nc.NotebookApp.port_retries = 0\n" > ~/.jupyter/jupyter_notebook_config.py
Run Notebook Server
As with the rest of the assembly and analysis workshop we will run our notebook servers inside an interactive job on the USP cluster. Begin by submitting an interactive job request:
$ qsub -q proto -l nodes=1:ppn=2 -l mem=64gb -I
Once the interactive job appears to be ready, you can launch the jupyter
notebook. The jupyter notebook command should start your notebook.
& means that it will run it in the background.
$ jupyter notebook &
Now ask jupyter to show you the list of running notebooks that belong to you, and you should see this:
$ jupyter notebook list
Currently running servers:
http://localhost:<my_port_#>/ :: /home/<username>
Test your notebook connection (Run on your laptop)
To test your jupyter notebook configuration you can open a new browser tab and go to:
http://localhost:<my_port_#>
You should see that your notebook server prompt you for your password
before it gives you access. This is the password that you entered above
during when we used the jupyter notebook password command. If
everything is working, and you type the password correctly, then you’ll
be presented with the jupyter dashboard running on the HPC! Magic!!!
If it does not work, proceed to the section about troubleshooting jupyter notebook connections.
What to do if the notebook is not working
This WILL happen to everyone at least once, probably many times. You
attempt to open your web browser to http://localhost/<my_port_#> and
you see the dreaded:

1) First, DO NOT PANIC!. Randomly clicking stuff is not going to fix the problem.
2) On your laptop start a new ssh tunnel using the Windows or mac/linux directions.
3) Open a terminal connection to the USP cluster and start a new notebook server jupyter notebook &
4) In a browser open a new tab and navigate to http://localhost:<my_port_#>
5) If it still doesn’t work, ask for help.
Useful jupyter tricks/ideas
Jupyter Notebook setup tl;dr
- On your local computer:
ssh -N -f -L localhost:<my_port_#>:localhost:<my_port_#> <username>@lem.ib.usp.br - On the cluster:
$ qsub -q proto -l nodes=1:ppn=2 -l mem=64gb -I
$ jupyter notebook &
What happens if I try to run two notebook servers at the same time
If you try to run a notebook server when one is already running you’ll get a message that looks like this:
$ jupyter notebook &
<username>@darwin:~$ [I 21:06:08.325 NotebookApp] The port <my_port_#> is already in use, trying another port.
[C 21:06:08.326 NotebookApp] ERROR: the notebook server could not be started because no available port could be found.
Note: This is because of the configuration settings we have imposed in the config file, not because of an inherent limitation of jupyter. It’s common and easy to run several notebook servers on one computer.
How to tell if the ssh tunnel is running (Mac/Linux)
On your local computer open a new terminal and type:
ps -ef | grep ssh | grep usp
If you don’t see a line that includes this ssh -N -f -L then it’s
not running, so you can restart it.
What does this error mean: “open failed: connect failed: Connection refused”?
This error indicates that your ssh tunnel is running, but your notebook server is not running. SSH to the cluster and restart your notebook server.
How to tell if the ssh tunnel is running (Windows)
I have no fuckin idea.
Killing a running jupyter notebook server
If you ever find that you have a notebook server running that you
need to kill, the easiest way is to use the pkill command. If you
do have a running notebook server then the results of the pkill
command will look something like this:
$ pkill -f jupyter -U <username>
<username>@darwin:~$ [C 21:01:58.180 NotebookApp] received signal 15, stopping
[I 21:01:58.181 NotebookApp] Shutting down 0 kernels
Starting a jupyter notebook server with command line arguments instead of a config file
You might find in the future that you want to run a jupyter notebook server
on some other computer, and that you only want to start it using command
line arguments, rather than setting up the config file. The we illustrate
usage of the three jupyter notebook arguments that correspond to the
three config file parameters we set. The first is --no-browser, which
tells jupyter to just run in the background and wait for connections.
The second is --port, which is very important for us. Each user must
enter the port number they were assigned on the AF-Biota workshop port #s page, and this should be the same port as entered above for the ssh tunnel. The third is --port-retries=0, which tells
jupyter to error out if our port is already occupied.
$ jupyter notebook --no-browser --port <my_port_number> --port-retries=0 &
IPython ipyparallel engines are dying? How can I solve this?
Here’s a solution. This is an esoteric problem.
Further exploration with jupyter notebooks
Here are links to a couple useful jupyter tutorials that explore much more of the functionality, should you be interested in learning more: